


 , Thomas Thornton 1, Ned Gilbert-Kawai 1
1 Critical Care Department, Royal Liverpool University Hospital, Liverpool University Hospitals NHS Foundation Trust, L17 8XP Liverpool, UK
Abstract
Tracheostomy insertion is becoming increasingly common in the UK. As patients with tracheostomies may be encountered in any healthcare setting, it is vital that doctors of all grades and specialties are familiar with the basic components of a tracheostomy and their management. This article aims to ‘demystify’ tracheostomies to enable the reader to feel more confident and competent at managing these patients in their clinical practice.
Keywords
- tracheostomy
- emergency care
- airway management
- airway obstruction
Tracheostomy insertion is becoming increasingly common, with approximately 12,000 tracheostomies inserted annually in the UK [1]. The procedure involves the creation of an artificial opening in the trachea to facilitate ventilation. Whilst commonly encountered in the intensive care setting, patients may present with a tracheostomy in situ in any healthcare setting and thus it is essential for doctors of all grades and specialties to be familiar with them. Levels of knowledge and confidence in the management of tracheostomy have been shown to be low amongst resident doctors and other healthcare professionals [2, 3, 4]. In this paper, we aim to diminish the anxieties many people have surrounding tracheostomy management by describing the indications for insertion, the basic components of the tracheostomy, and the management of potential complications that may arise in patients with a tracheostomy.
There are a wide variety of indications for a tracheostomy, and these may be seen in Table 1 [5].
| Airway protection | In patients who are unable to maintain their own airway (e.g., neurological conditions, reduced consciousness, head injuries, stroke) |
| Prolonged mechanical ventilation | To facilitate a respiratory wean from a mechanical ventilator |
| Airway secretion management | Direct suctioning can be performed to facilitate clearing of excess secretions where there is a poor cough effort |
| Surgery | Head and neck resections |
| Upper airway obstruction | To maintain a patent airway in a patient with upper airway obstruction |
Legend: Indications, alongside further explanations, for the insertion of a tracheostomy.
Broadly speaking, there are two methods for inserting a tracheostomy: percutaneously or surgically [6, 7]. A percutaneous tracheostomy is normally performed in the intensive care unit and involves a modified Seldinger technique. Under direct bronchoscopic vision, a needle is inserted through the skin at the front of the neck into the trachea, the tract is gradually dilated over a guidewire, and the tracheostomy tube is subsequently inserted [8]. By contrast, for a surgical tracheostomy (often undertaken due to unfavourable anatomy or increased bleeding risk), an open approach is used with dissection through the infrahyoid muscles to expose the tracheal rings [9]. Under direct vision, an incision is then made between the second and third tracheal rings through which the tracheostomy tube is inserted.
Tracheostomies are not the only artificial airways that may be encountered on the wards, and it is of vital importance to appreciate the anatomical differences, and thus different management plans, between a patient with a tracheostomy and one with a laryngectomy (Fig. 1, Ref. [10]). Whilst patients with a tracheostomy will usually have a patent upper airway connecting to the trachea, patients with a laryngectomy will not. Therefore, it is not possible to ventilate a patient with a laryngectomy via the upper airway. The management of airway emergencies is therefore different between these two groups of patients [10].
 Fig. 1.
Anatomical differences between a tracheostomy and a laryngectomy. Legend: A schematic to show the anatomical differences in a patient with a tracheostomy (left) compared to one with a laryngectomy (right), demonstrating the lack of an upper airway in patients with a laryngectomy. Drawn by the author using Goodnotes App (Goodnotes 5, Version 6.5.9, Goodnotes Limited, London, UK). Adapted with permission from McGrath et al. [10], Anaesthesia; published by The Association of Anaesthetists of Great Britain and Ireland.
As the upper airway is bypassed with the creation of tracheostomy, there are several associated physiological changes [11, 12]. These include the following: humidification, anatomical dead space and resistance, speech and swallowing.
Tracheostomies bypass the nasopharynx, preventing the humidification and warming of inspired air [13]. A lack of humidification may lead to chronic inflammatory changes and reduced ciliary function which may in turn increase the risk of respiratory tract infections. Air must therefore be artificially humidified using heat-moisture-exchange (HME) filters or heated humidifiers.
Although the small diameter of tracheostomy tubes increases airflow resistance, resistance to flow is lower than that of an endotracheal tube due to the shorter length of tracheostomy tubes [11]. The presence of the tracheostomy thus reduces the anatomical dead space thereby improving the work of breathing [14].
As the passage of air through the vocal cords is bypassed by the presence of a tracheostomy tube (with its cuff inflated), phonation is inhibited, and this can be a source of anxiety and frustration for patients [12, 15]. There are devices such as speaking valves that can enable patients to vocalise, however for speech to be attempted, patients need to be able to tolerate periods of cuff deflation without respiratory compromise or aspiration risks [16].
At its most basic level, a tracheostomy can be thought of as a simple tube passing from the front of the neck directly into the trachea through which air can flow as the patient inhales and exhales. Whilst this concept is not new, and indeed records exist from 3600 B.C. the creation of such a conduit, today a large variety of different tracheostomy tubes exist (Fig. 2)—the variation of which can often cause a degree of confusion amongst members of the clinical team [5].
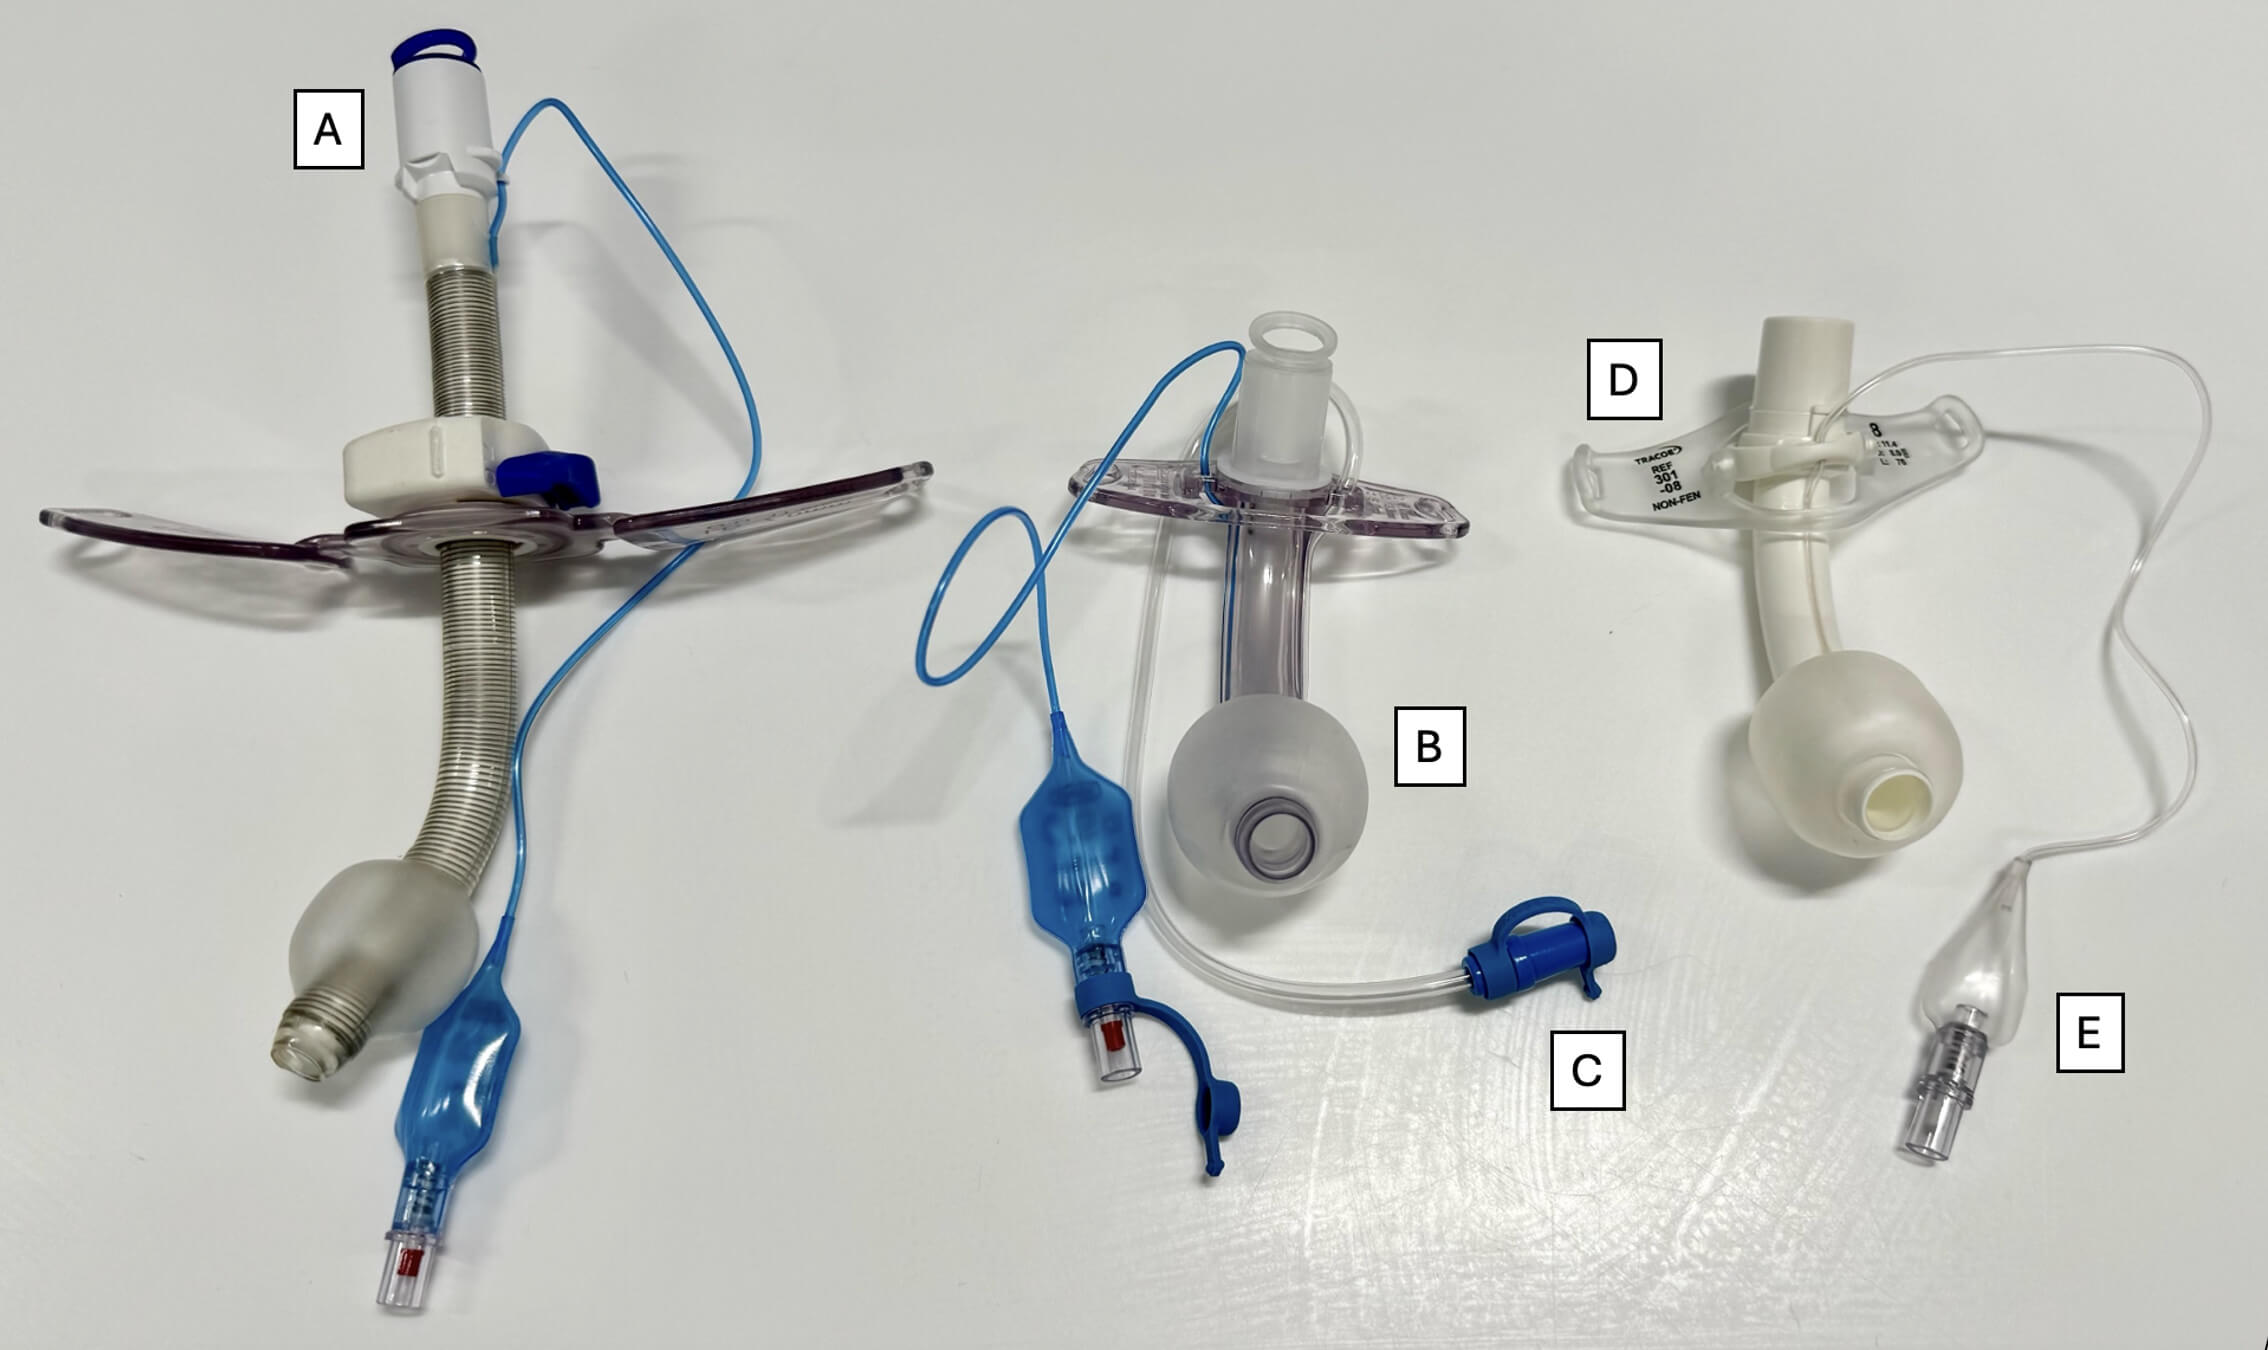 Fig. 2.
Comparing the difference in appearance between three tracheostomy tubes. Legend: A Portex tracheostomy with adjustable phalange (left), a Portex tracheostomy with non-adjustable phalange (middle) and a Trachoe Twist (right). Other components include the 15 mm connector (A), inflated cuff (B), the subglottic suction port (C), flange (D) and pilot balloon (E). Photo taken by author.
To aid familiarisation, all tracheostomies can normally be described by the size of the tracheostomy tube and by the presence or absence of three components [19]:
(i) A cuff.
(ii) An inner cannula.
(iii) A hole or ‘fenestration’.
Knowledge of these parts may allow for troubleshooting during a tracheostomy emergency.
The size of a tracheostomy is usually defined by the internal diameter (in millimetres) at the tube’s narrowest point. This number is commonly marked on the outer aspect of the tube. The size of tracheostomy selection by the clinician inserting the tube should correspond to the estimated size of the patient’s trachea (often male size 8–9, female size 7–8). Incorrectly sized tubes may result in complications such as increased work of breathing during spontaneous ventilation, increased airway resistance, increased cuff pressures required to maintain a seal, mucosal injury and leakage [20].
The cuff is a soft balloon located at the distal end of the tracheostomy tube (Fig. 3). Once inflated via the pilot balloon, the cuff creates a sealed airway which allows for the provision of positive pressure ventilation whilst also protecting the airway from secretions from the upper airway and the regurgitation of gastric fluid [19]. Uncuffed tubes are available for patients who require a long-term tracheostomy yet retain reasonable bulbar function, can breathe spontaneously, and can manage their own secretions [21]. The uncuffed tube allows respiration to take place via both the upper airway and tracheostomy which aids phonation and swallowing whilst reducing the risk of tracheal damage that may be caused by an uninflated, cuffed tube [20].
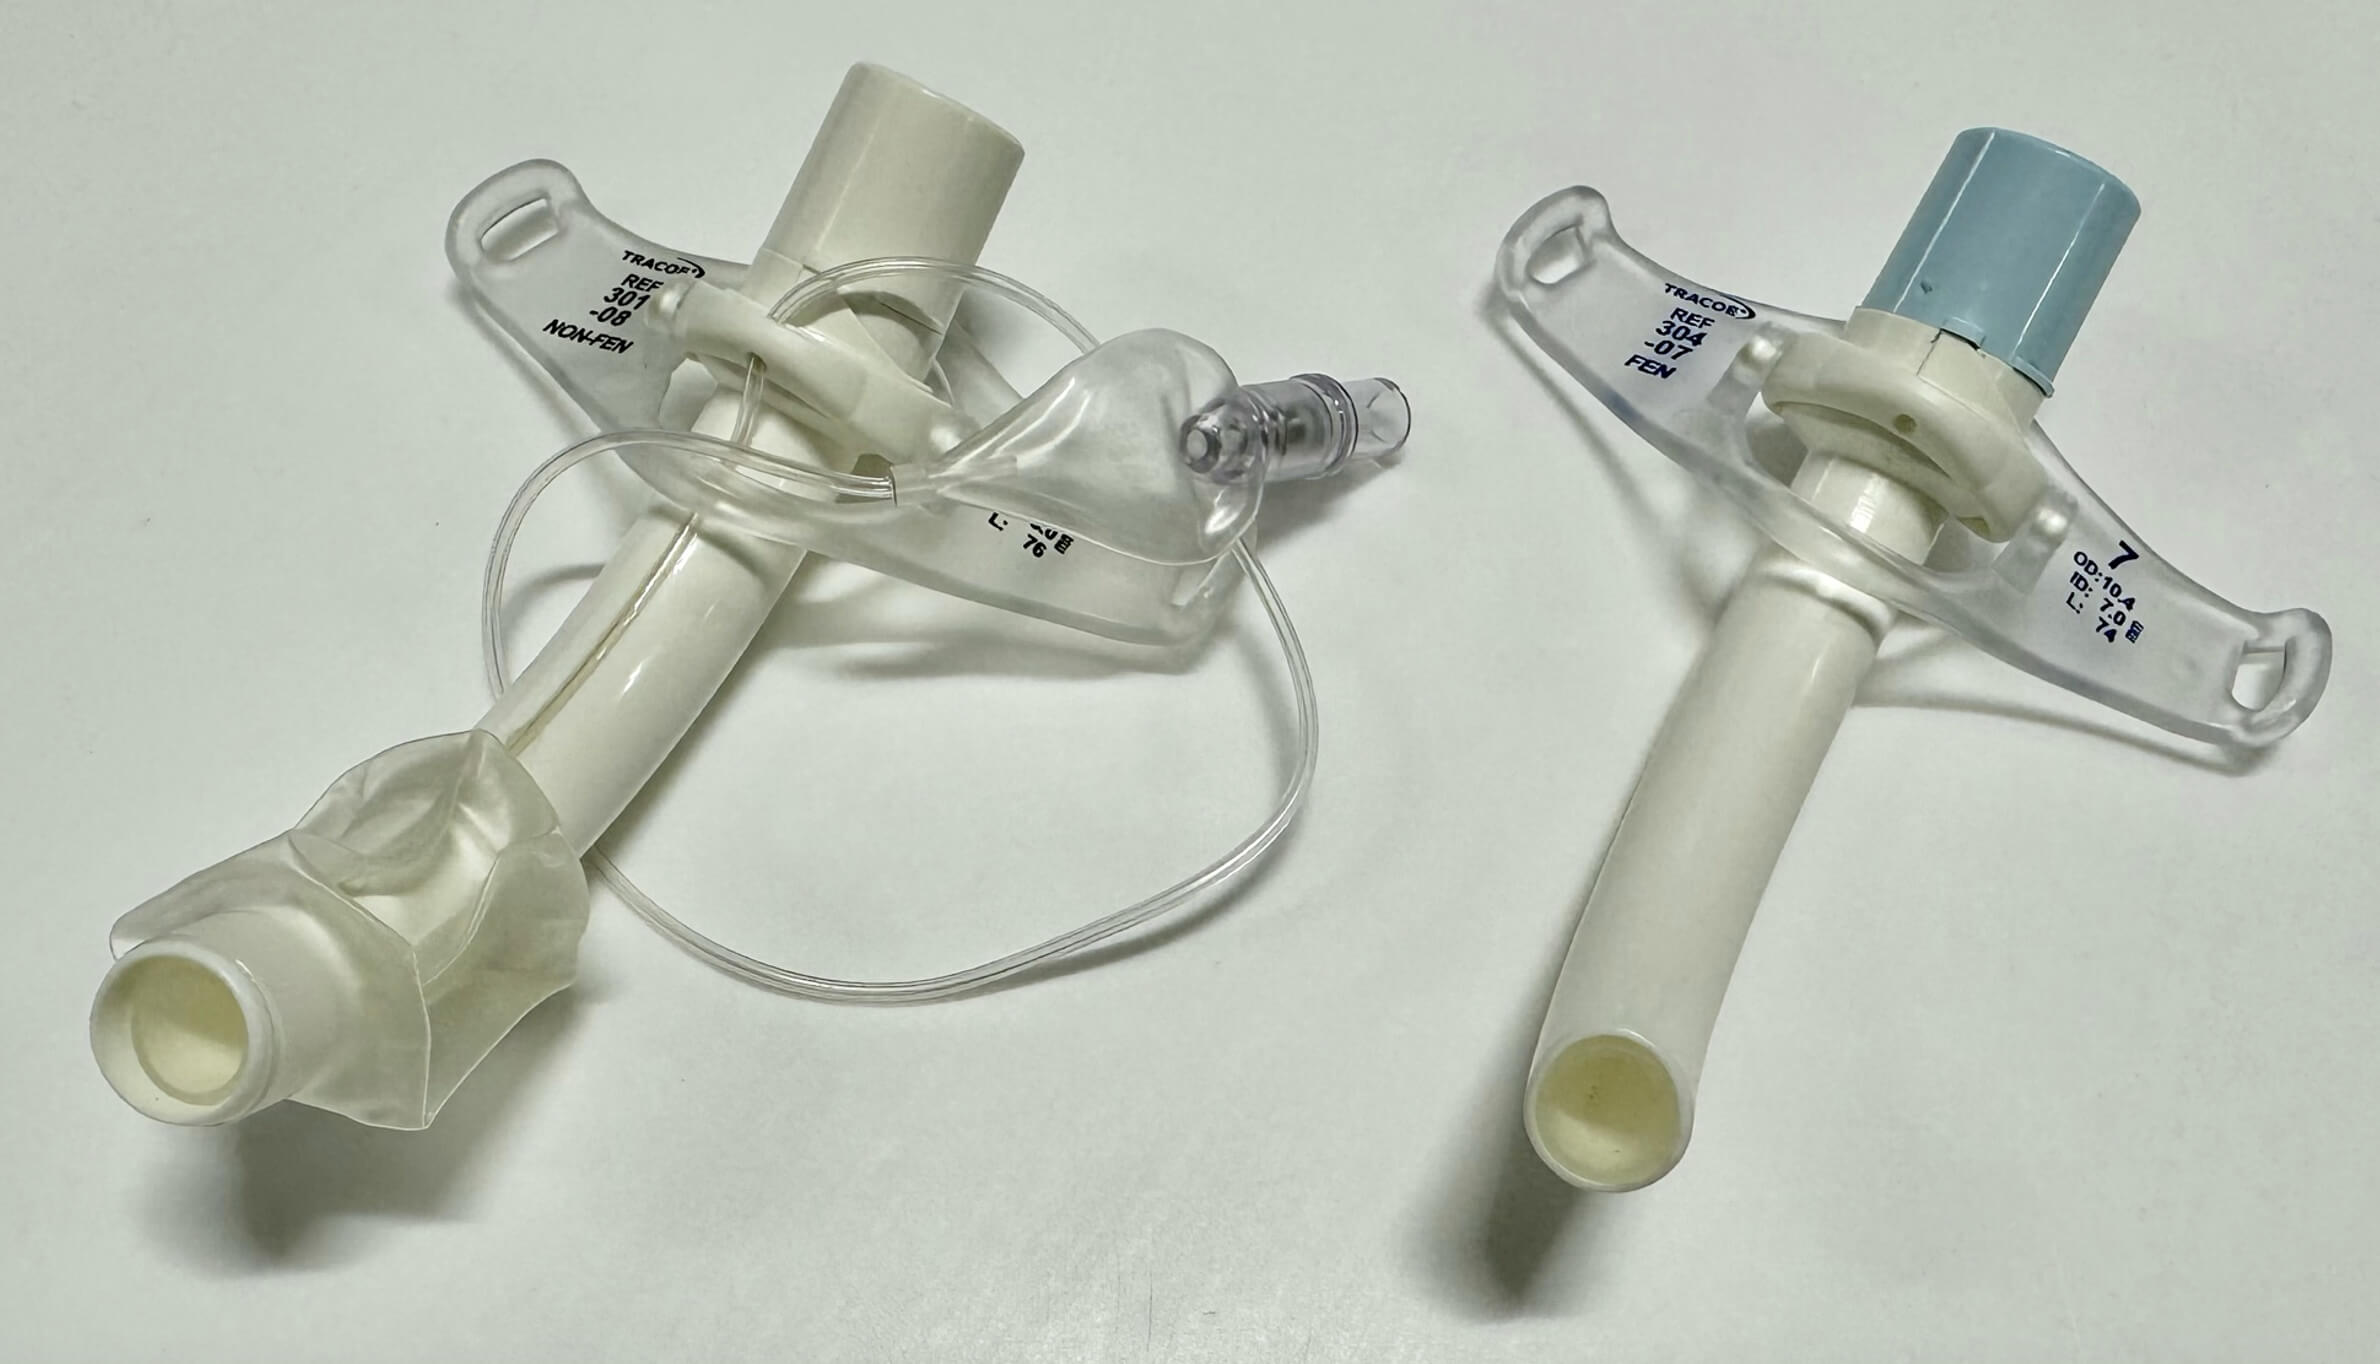 Fig. 3.
Comparing the difference between a cuffed and non-cuffed tracheostomy tube. Legend: An image showing a cuffed tracheostomy tube with the balloon deflated (left) and an uncuffed tracheostomy tube (right). Note also that both have an inner cannula in situ. Photo taken by author.
The tracheostomy tube may include an inner cannula which can be removed independently from the tracheostomy tube to allow for regular cleaning and clearing of secretions. If left unmanaged, excess secretions may cause partial or complete obstruction of the tube, resulting in potentially life-threatening complications [20].
A fenestrated tracheostomy tube (Fig. 4) has either one or multiple small openings (depending on the type/manufacturer) in the superior aspect of the tube [20]. When the cuff is deflated and a corresponding fenestrated inner cannula is in situ, air may pass from the trachea to the larynx both around the tube and through it via the fenestrations. This will increase airflow through the larynx thus promoting speech and can be used to assess whether a patient is suitable for decannulation. To enable positive pressure ventilation via the tracheostomy, a fenestrated inner cannula should be switched to a non-fenestrated inner cannula, the cuff inflated, and appropriate breathing equipment attached to the 15 mm port to provide ventilatory breaths.
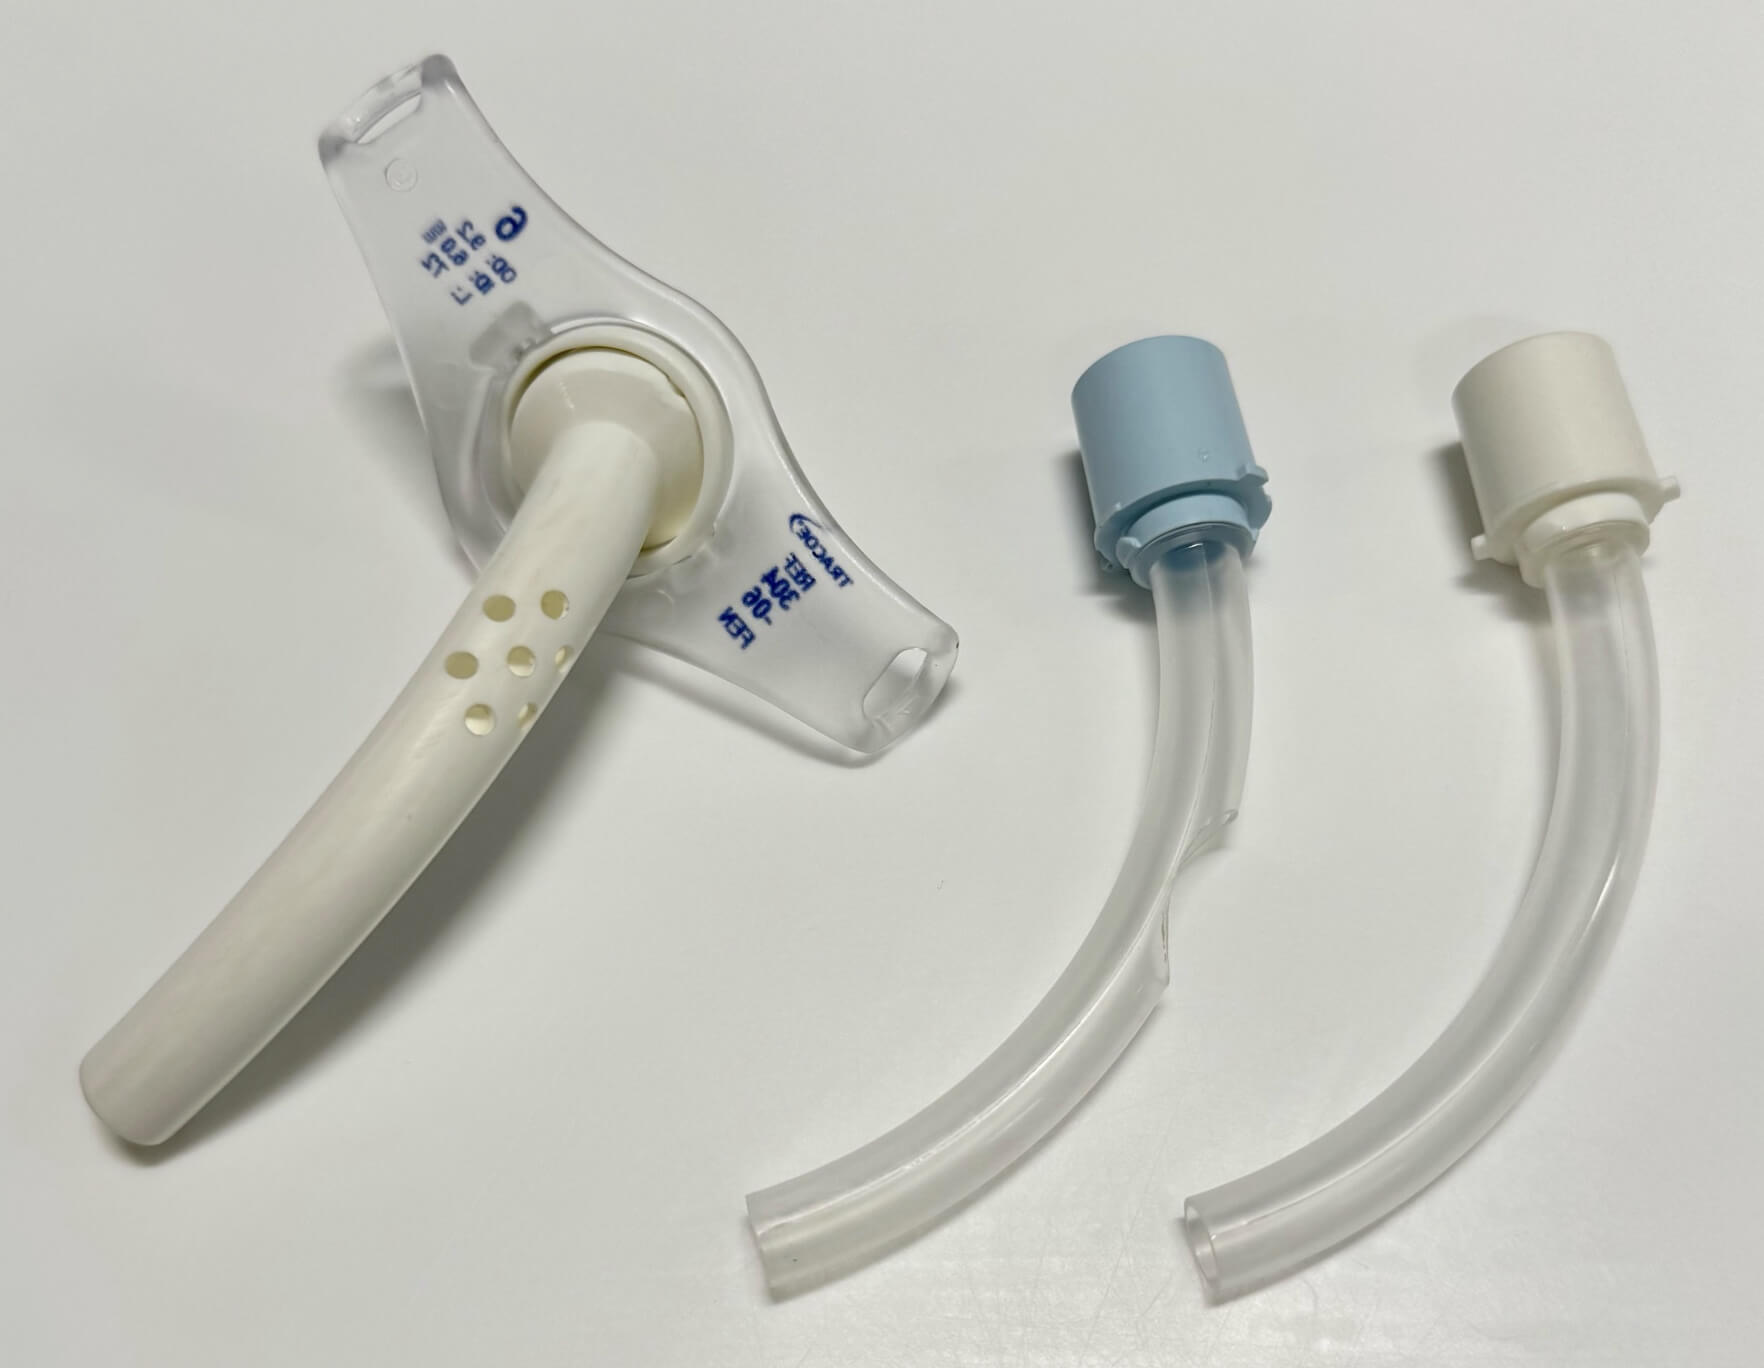 Fig. 4.
Components of a fenestrated tracheostomy cannula. Legend: An image showing a fenestrated tracheostomy (left), a fenestrated inner cannula (middle) and an unfenestrated inner cannula (right). It is imperative to note that some tracheostomy tubes must have the inner cannula in situ to enable them (and their 15 mm connector) to attach to the associated ventilator/bag-valve-mask. Photo taken by author.
Other notable components of a tracheostomy may include:
Subglottic suction port: This allows for the regular clearance of respiratory secretions that collect above the cuff which in turn may reduce the risk of significant complications associated with the micro-aspiration of respiratory secretions [22].
The flange: This allows the position of the tracheostomy tube to be maintained once sited, either by sutures (fixed) to the skin or by connection of a foam neck strap (adjustable). Adjustable flange tracheostomy tubes are also used whereby the length of tube inserted through the patient’s neck can be altered and these are useful in cases such as in those with altered neck anatomy, neck masses, tracheal stenosis or obesity [23].
Passy-Muir Valve (PMV): This is a one-way valve that enables speech in patients with a tracheostomy tube (Fig. 5). The valve opens during inspiration and then closes during expiration which forces air up through the vocal cords to allow for vocalisation. For this to occur, it is imperative that the cuff (if present) is deflated otherwise expiration will not be possible.
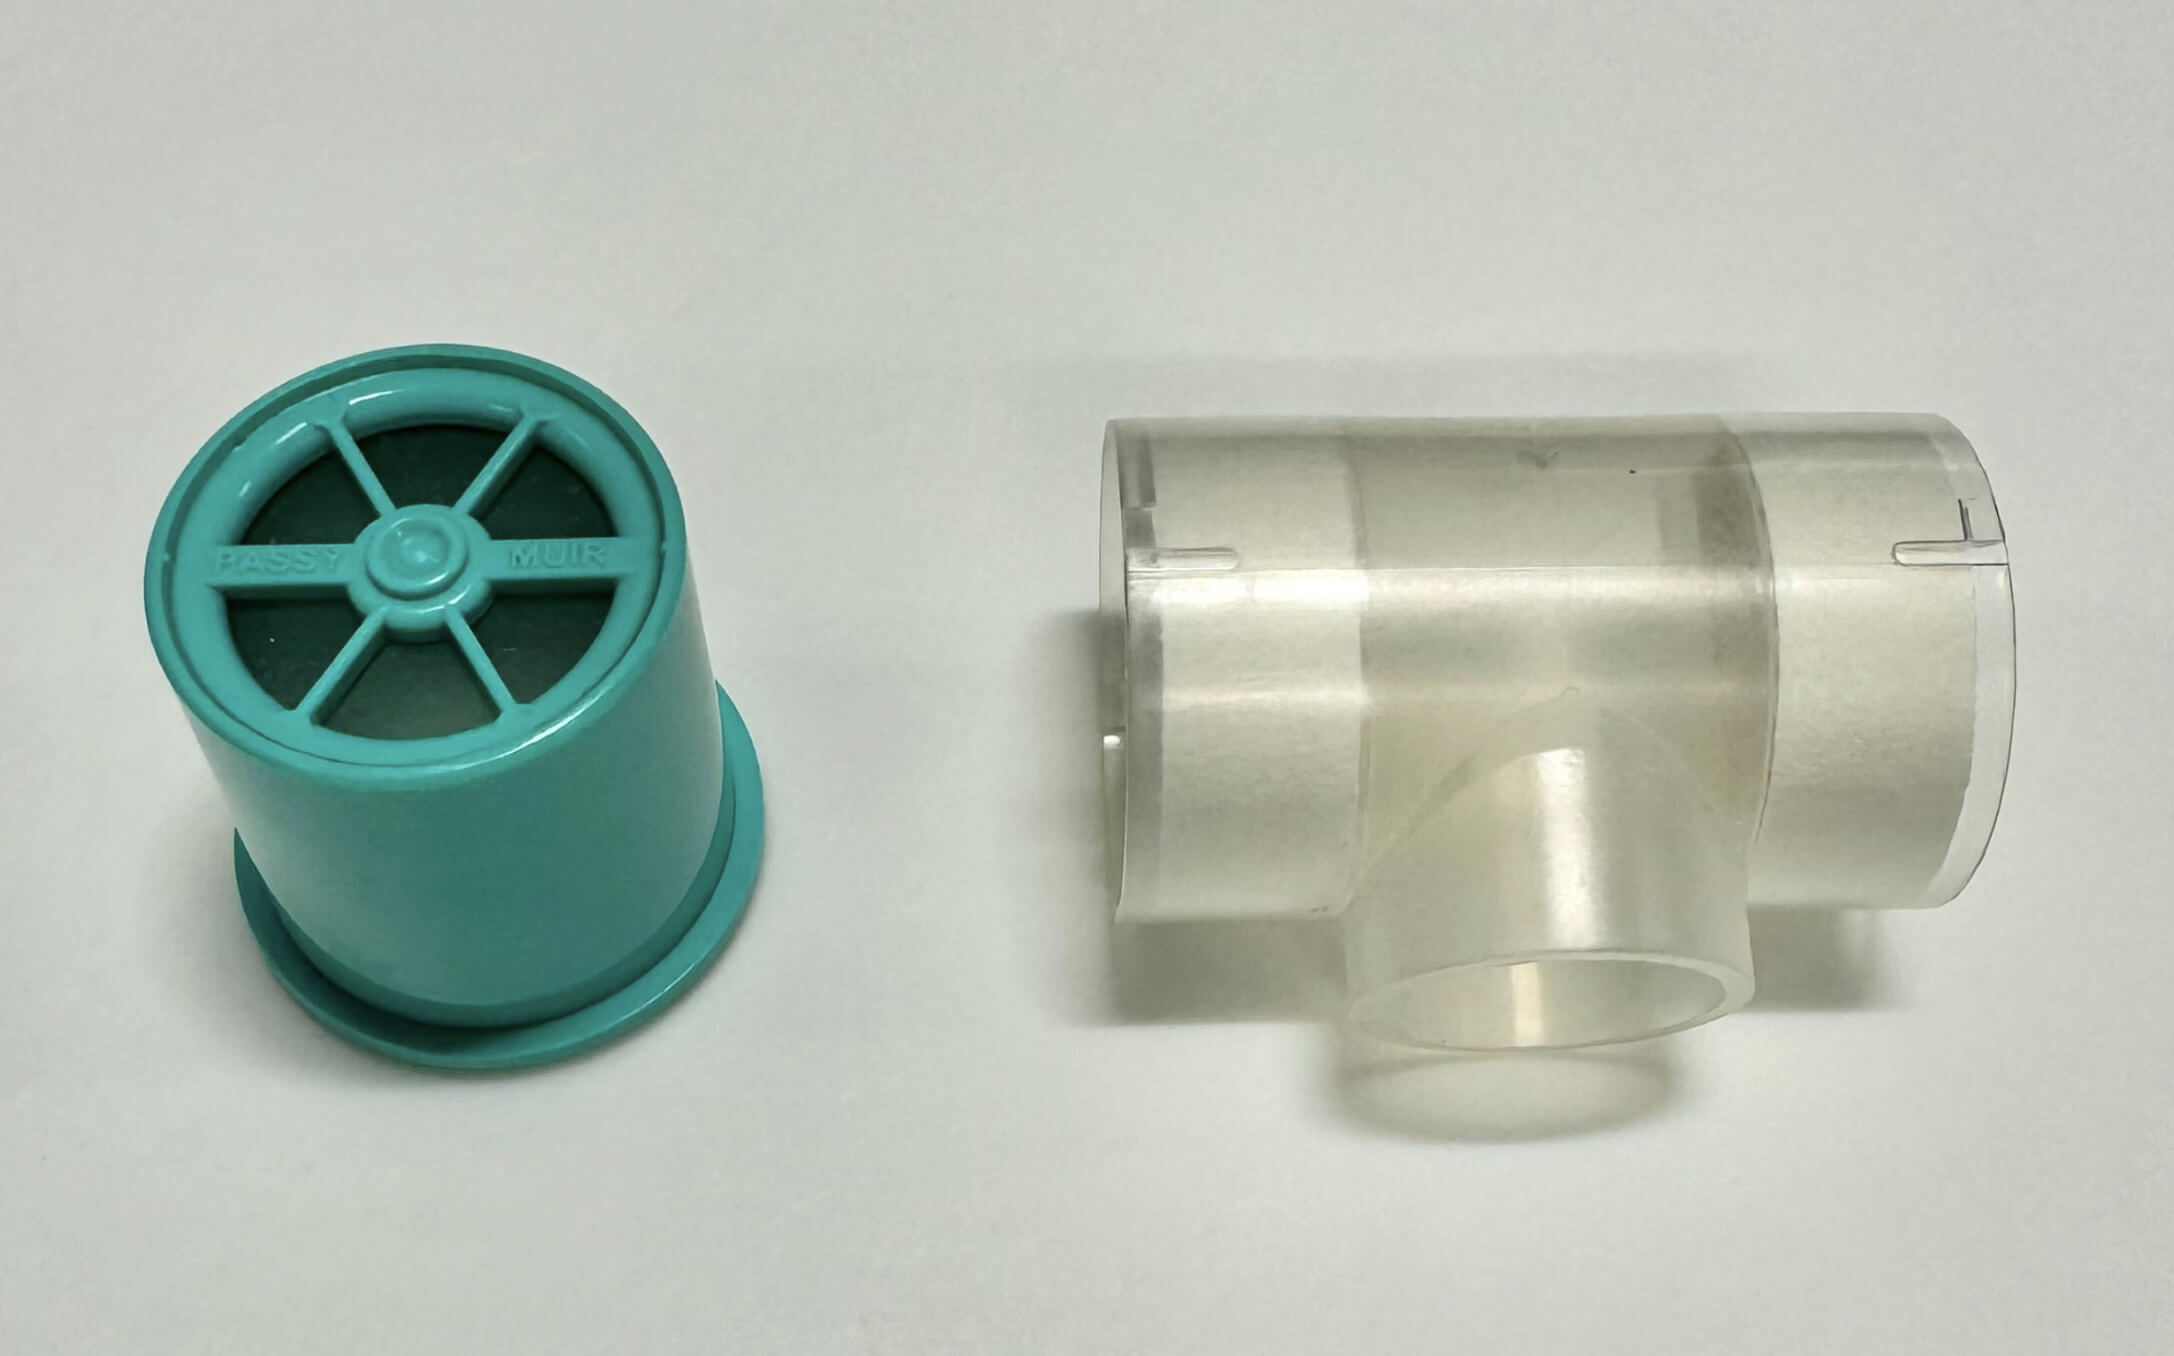 Fig. 5.
Comparing additional components of a tracheostomy tube. Legend: An image depicting a Passy-Muir Valve (left) and a Swedish nose (right). Photo taken by author.
Swedish Nose: This is a form of HME filter (Fig. 5) which is connected to the tracheostomy port and acts to humidify gases in patients who are self-ventilating [10]. It also aims to humidify secretions, thus aiding with expectoration and thereby reducing the risk of secretions occluding the tracheostomy tube [24].
The ‘Blue box’: All patients with a tracheostomy should always have a ‘Blue box’ (or Trachi-case) by the bedside. As per Fig. 6, it contains all the necessary equipment to manage and change the tube in an emergency.
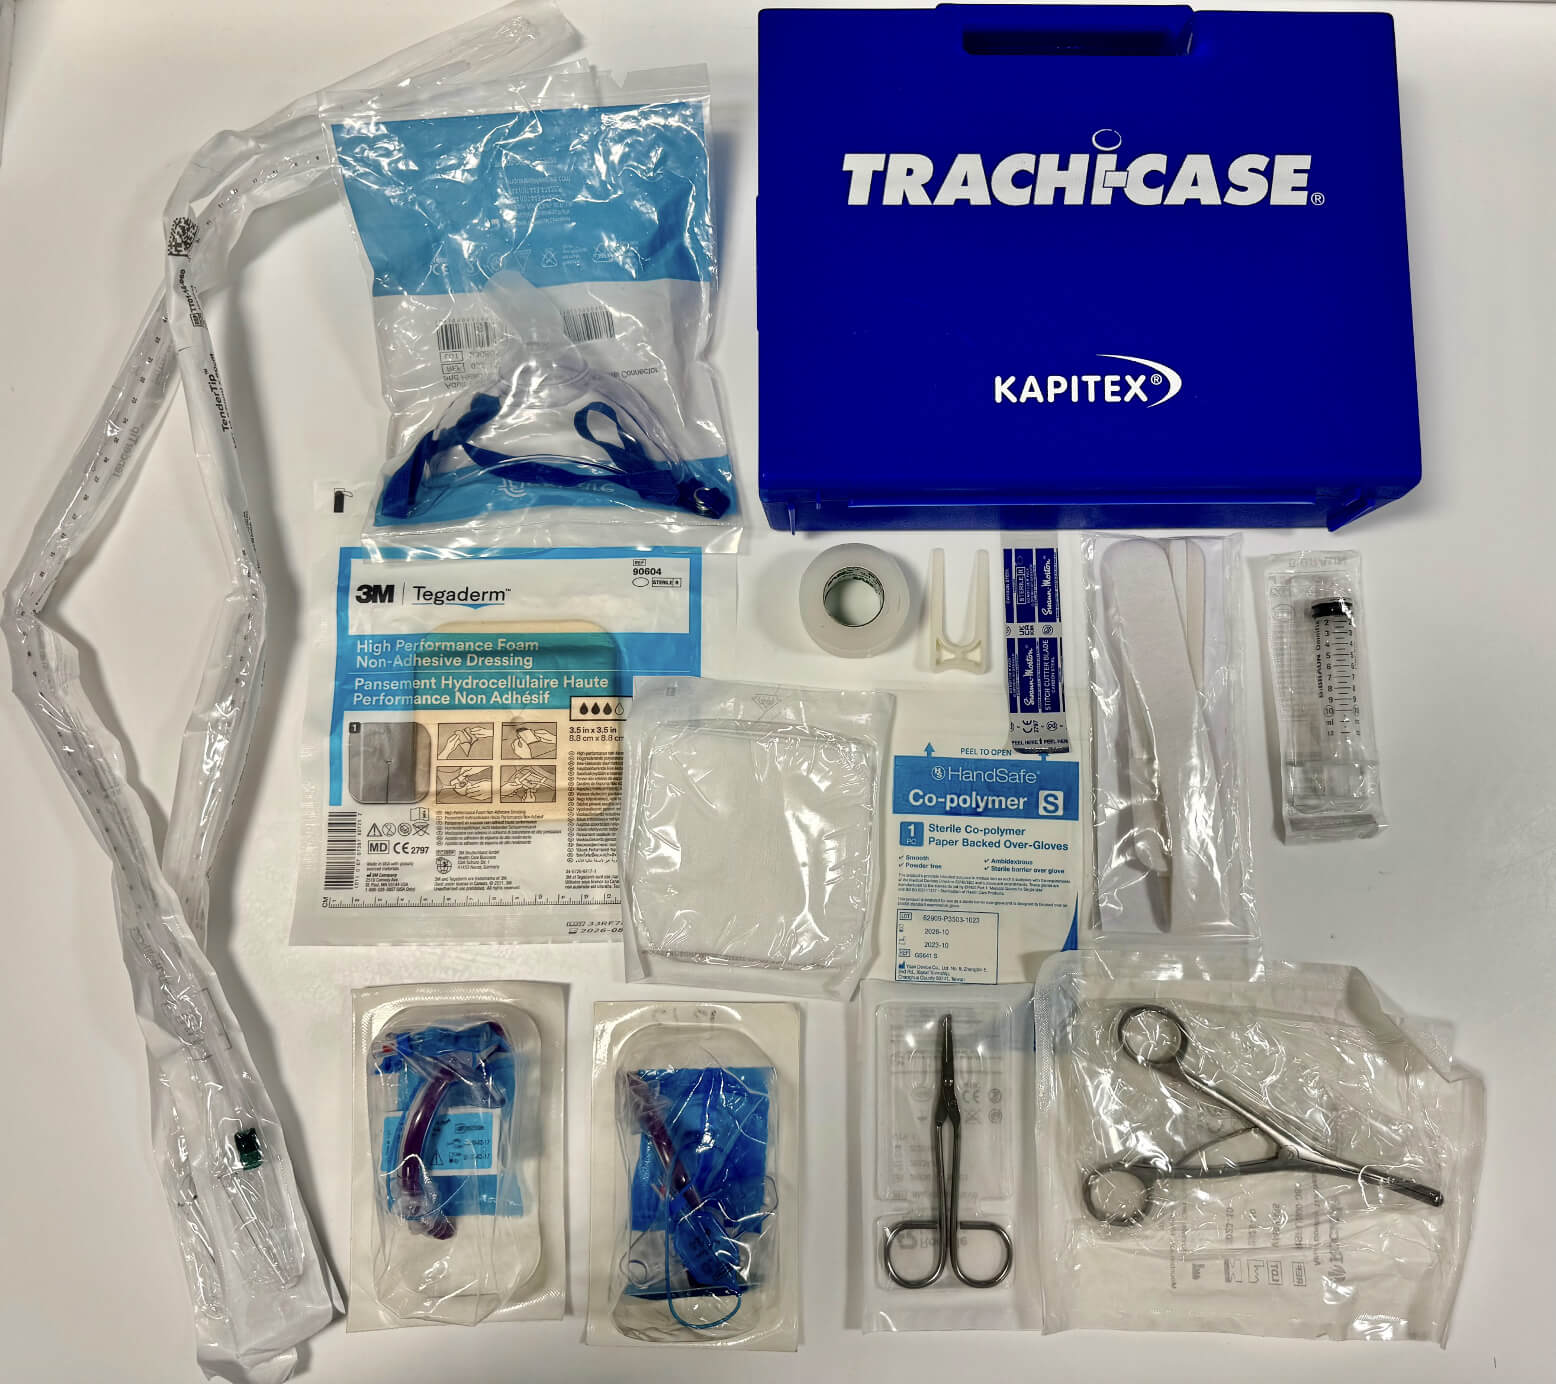 Fig. 6.
Blue tracheostomy box. Legend: A patient’s tracheostomy box containing replacement tracheostomies (normally one of the same size and one below), suction catheters, tracheostomy mask, tracheostomy tapes and dressing, gauze, stitch cutter, sterile gloves, forceps, and an intravenous syringe. Photo taken by author.
The potential complications of a tracheostomy can be categorised into early, short-term and long-term complications (Table 2) [19, 25, 26, 27].
| Early | Short-term | Long-term |
| • Haemorrhage | • Blocked tube | • Tracheal stenosis |
| • Aspiration | • Accidental tube displacement | • Tracheomalacia |
| • Pneumothorax | • Pneumothorax | • Tracheo-cutaneous fistula |
| • Failure of insertion | • Surgical emphysema | • Tracheo-oesophageal fistula |
| • Cuff deflation | • Infection | • Decannulation problems |
| • Injury to the recurrent laryngeal nerve | • Delayed haemorrhage | |
| • Tracheal necrosis | ||
| • Tracheo-innominate artery fistula |
Legend: Table classifying a list of potential complications associated with tracheostomy into early, short and long-term complications.
Should one be called to any potential complication relating to a tracheostomy, a systematic assessment of the patient should be undertaken whilst also having a low threshold to call for senior help and an anaesthetist. Of the above highlighted complications, two warrant special mention.
This is the most common complication encountered related to tracheostomies, one that all members of the clinical team should be most familiar with. That said, help is at hand, for details of a patient’s tracheostomy should always be located either above or around their bedspace in the form of a green sign (Fig. 7) [10]. This will include the insertion date, tracheostomy brand, size and insertion method.
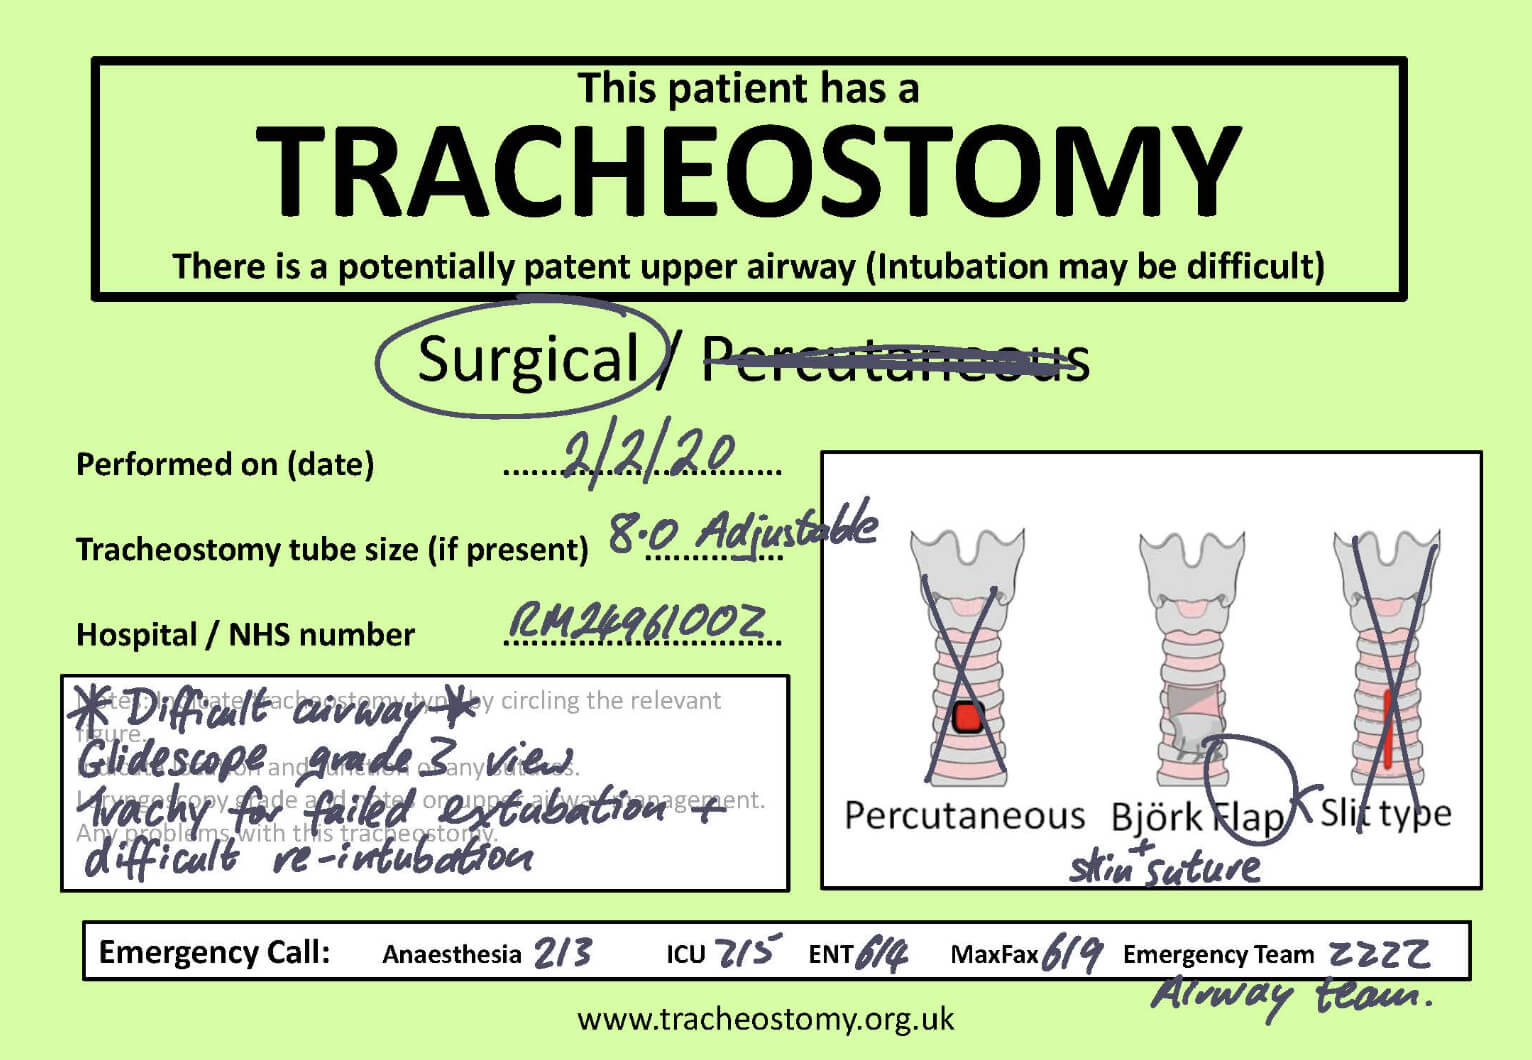 Fig. 7.
The National Tracheostomy Safety Project adult bedhead green sign. Legend: The bedhead sign should be placed by all patients who have a tracheostomy and should be with the patient on all transfers. It contains pertinent information such as insertion date, tracheostomy type and insertion method and grade of intubation. Reproduced with permission from the National Tracheostomy Safety Project (https://www.tracheostomy.org.uk). ICU, intensive care unit; ENT, Ear, Nose and Throat.
The National Tracheostomy Safety Project (NTSP) has produced an emergency tracheostomy algorithm (Fig. 8) which offers a stepwise approach to the emergency management of an obstructed tracheostomy [10]. In an emergency involving an obstructive tracheostomy tube, one should follow the algorithm in a stepwise manner whilst awaiting expert help. The initial steps include calling for airway expert help, then assessing the patient’s tracheostomy using the ‘look, listen and feel’ method at the mouth and the tracheostomy.
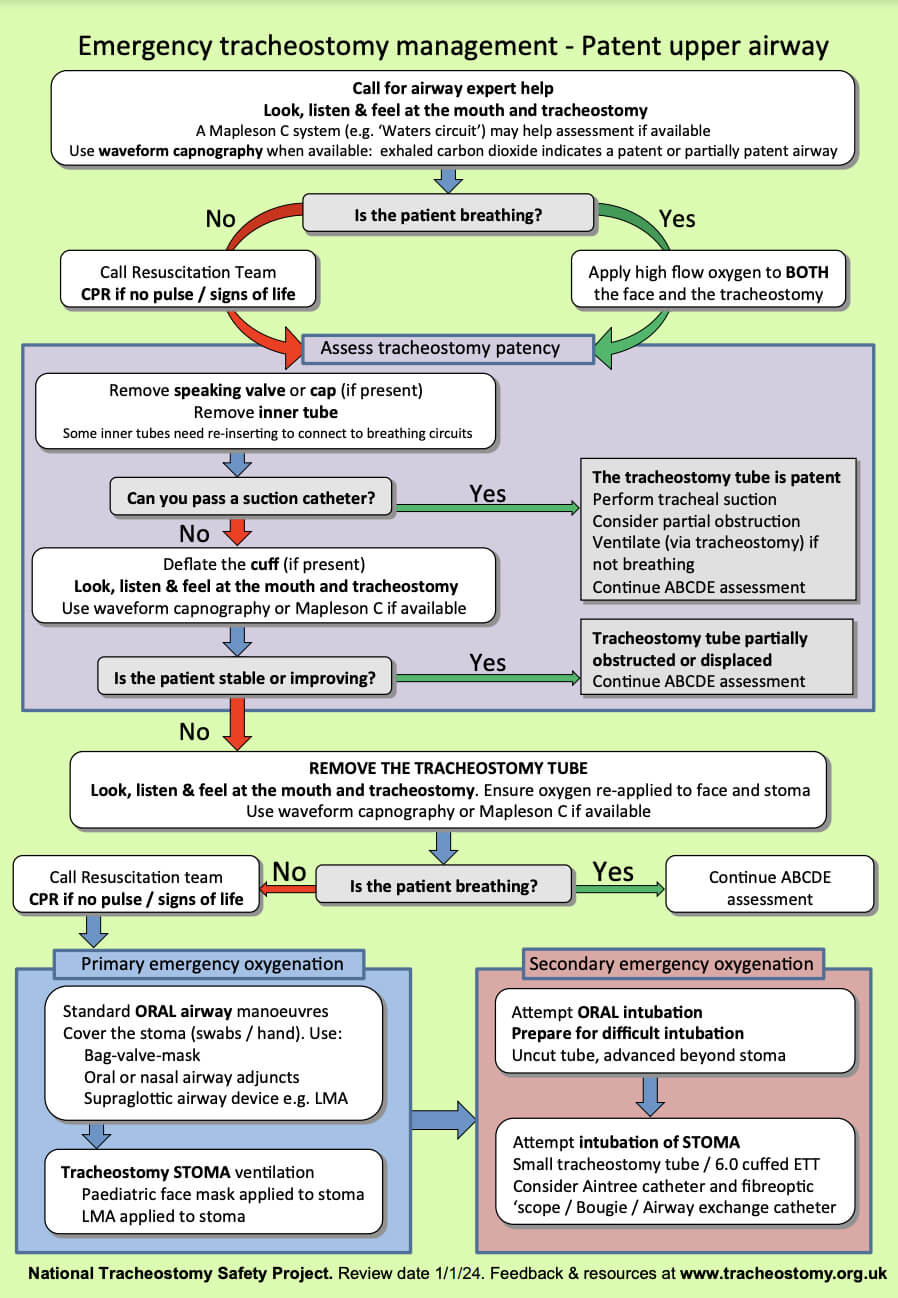 Fig. 8.
The National Tracheostomy Safety Project tracheostomy algorithm. Legend: The green algorithm is used for emergency tracheostomy management in a patient with a patent upper airway. Reproduced with permission from the National Tracheostomy Safety Project (https://www.tracheostomy.org.uk). CPR, cardiopulmonary resuscitation; LMA, laryngeal mask airway; ETT, endotracheal tube.
Conversely, a pink NTSP laryngectomy algorithm is required for laryngectomy patients (Fig. 9).
 Fig. 9.
The National Tracheostomy Safety Project laryngectomy algorithm. Legend: The pink algorithm is used for emergency laryngectomy management. As detailed above the salient difference between this and the tracheostomy algorithm is that laryngectomy patients have an end stoma and cannot be oxygenated via the mouth or nose. Reproduced with permission from the National Tracheostomy Safety Project (https://www.tracheostomy.org.uk).
In the case of bleeding from or around a tracheostomy, senior help should be sought immediately. The airway must be assessed for obstruction and clotting abnormalities should be treated [19]. There are several causes of bleeding from a tracheostomy, the cause of which typically varies over time [25]. Early haemorrhage from a tracheostomy (within 48 hours of insertion) is typically associated with factors such as traumatic puncture of anterior jugular or inferior thyroid veins, systemic coagulopathy, erosions secondary to tracheal suction or bronchopneumonia. The underlying cause should be investigated and treated.
Late haemorrhage, typically presenting with a self-limiting sentinel, or herald bleed, 4–14 days post procedure must be thought of as a tracheo-innominate artery fistula until proven otherwise [28, 29]. Whilst such bleeds are rare (0.1–1% of tracheostomy insertions), they are potentially rapidly life-threatening so Ear, Nose and Throat (ENT) surgeons should immediately be made aware and an urgent Computed Tomography (CT) angiogram ordered [28].
For those readers who would like to read more about tracheostomies and their management, we would advise them to visit the National Tracheostomy Safety Project website [30].
With tracheostomy insertion becoming increasingly more common in the UK, there is a high likelihood that clinicians will encounter patients with a tracheostomy in a variety of healthcare settings. Staff may often be unfamiliar with caring for a patient with a tracheostomy, both in the ‘day-to-day’ and emergency settings, and thus we hope this article has served to ‘demystify’ tracheostomies and allows the readers to feel more confident and competent at managing these patients in their clinical practice.
This article addresses the following requirements from the internal medicine training curriculum:
Not applicable.
All authors (HA, TT, NGK) have contributed equally to the design and writing of this article. All authors contributed to significant editorial changes in the manuscript. All authors read and approved the final manuscript. All authors have participated sufficiently in the work and agreed to be accountable for all aspects of the work.
Not applicable.
Many thanks to the National Tracheostomy Safety Project for sharing their images and resources for this review.
This research received no external funding.
The authors declare no conflict of interest.
References
Publisher’s Note: IMR Press stays neutral with regard to jurisdictional claims in published maps and institutional affiliations.